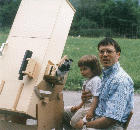
Dear visitor, this page is intended to give you an idea of why and how this instrument was built. It describes a journey that began in my teens.
History :
Soon after the six-inch, f/5 Newtonian
I built with my father's help saw first light, I realized that it had problems. It
offered great views, but it did not show all the planetary detail I had hoped to
see. But all the books said that it should! I tried to find out why and read more.
From time to time I came across strange-looking arrangements of mirrors called schiefspieglers. I shook my head - how ridiculous! How should that work? But excellent image quality was attributed to these telescopes. I became interested and started grinding a 6", two-mirror design. But I could not cut out the convex secondary from the tool for the primary. I abandoned the project. The Duran (a material similar to Pyrex) disks disappeared for ten years into a corner of my parent's garage.
In late 1993, a two-part article authored by Michael Brunn of Germany appeared in Sterne und Weltraum, the leading German-language magazine of amateur astronomy. His articles not only described the history of these instruments, but also introduced his own four-mirror designs.
I was immediately fascinated. These designs offered well-corrected, wide fields at reasonable speeds. The dimensions of the instruments were manageable, in some cases really compact. Glass work comprised fabrication of spheres of no extreme radii; only perfectionists would feel a need to apply a mild ellipsoidal figure to the primary.
But work could not start immediately. First I had to finish university, then married and moved to a new flat. Our son was born. In short, there was plenty to do.
Before starting out to build such a complex telescope, I felt it was completely in order to gain a little experience. So I made a 4-1/2", two-mirror Kutter telescope from a set of commercial optics made by Lichtenknecker Optics of Belgium. This instrument has proved to work very well. It is easy to use and align.
Optics :
I settled on an six-inch aperture. I wanted a transportable instrument and the blanks
were already on hand. Remember the abandoned project? Fabrication of the spherical
primary went very smoothly, no problems here.
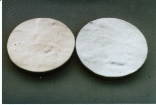
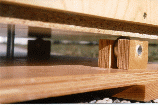
The convex secondary and the concave tertiary were cut out of an old, 1cm (0.4 inch)
thick piece of plain window glass. It would have been very difficult to get Duran disks
of the right size. The following procedure was used to get the disks:
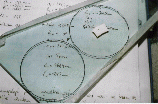
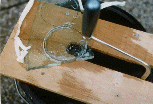
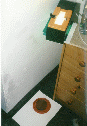
The diameter was drawn onto the glass with an indelible felt-tipped pen. The circle was then protected with a layer of transparent adhesive tape. Next, I got a carbide-coated blade for the hand saw. A jig was fashioned from a piece of plywood and, for reinforcement and to prevent lateral motion, two strips of pine were afixed to the plywood. This setup, shown in the photograph, was placed atop a bucket filled with water to the rim to provide cooling and to bind the injurious glass particles. Wear gloves during sawing. One of these carbide blades lasts long enough to cut out two 8cm (3-1/8 inch) disks.
Cutting out the disks is a caveman's job, but it works. Take your time. Don't worry about the chips of glass that break off at the sides: they will be removed during grinding.
I recommend using 180 to 220 carbo for working out the radius since so little stock needs to be removed. Fine grinding will be shorter.
Checking the concave elements' radii is done optically. Due to the great tolerances inherent in these designs, it is never necessary to use a spherometer. For better precision, a mask with a 3mm (1/8") hole was placed over the reflector of a flashlight. The mirror under test is placed in a vertical position and wetted. Holding the flashlight close to the eyes, one examines the direction of the reflection of the flashlight in the mirror when you move the flashlight up and down. If the reflection moves the same way, it is located inside the radius of curvature. If it moves the opposite way, it is already outside. You want to find the point where you can't see a clear direction of movement. That's the center of curvature. It can be found with a precision of 1-2 cm (0.4 - 0.8inch) with this simple procedure and is more than sufficient for the mirrors of tilted-component telescopes (TCT's).
If your mirror has too short a radius of curvature, lengthen it by changing the position of mirror and tool: tool on top. Frequent interchange of the position of the tool and mirror in the last stages of fine grinding, will help in getting the radii of the mirrors close together, which is critical for testing later on.
The finer the emery gets, the smaller are the quantities I use. In the last stages of
fine grinding, very little emery is used; the wets last only a few minutes. One then feels
the emery biting the glass.
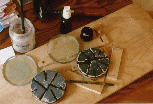
Polishing is done the usual way. The polishing tools for the secondary and tertiary mirrors were made of two flat disks of exterior grade plywood. They were left flat because of the mirrors' very long radii of curvature. To make sure that the disks do not warp when wet, they got three coats of a high-quality, waterproofing varnish. The old pitch I had was made a bit more compliant by adding a liquid wood distillation product.
Cerium oxide is my polishing agent of choice. Suspend it in water and use, especially in the later stages of polishing, the finest fraction, that is, the particles that settle last. I frequently stopped for pressing during polishing and used slow and even strokes. That helps getting a smooth surface which is really important for good definition. Move evenly and avoid uneven pressure. Do not polish when nervous, or after a cup of strong coffee. Polishing takes a quiet mind.
As John Francis pointed out in his excellent July 1999 article in Sky & Telescope, strive for the best polish you are capable of since four surfaces contribute to the final image. I frankly admit that I failed in this respect with the primary.
The tertiary was Foucault-tested the usual way and is of precise spherical figure except for a narrow, uncorrectable turned-down edge. This is masked off in use since it is not needed. This is one of the less obvious advantages of TCT's: one can always use a bit oversized mirrors to get rid of the problems which arise from using the edges of optical elements. The secondaries of the usual coaxial telescopes are usually used out to the very edge to keep the obstruction low.
Testing the Convex :
Now we come to the testing of the convex secondary. It is the component that brings an
expression of fear into the eyes of ATMs when I talk about these systems. But in my
experience of making two convex elements (the first one broke by accident) there is no
mystery in making them if they are carefully tested throughout polishing.

The first thing to keep in mind is to keep the radii of mirror and tool as close together as possible during fine grinding. This is done by occasionally changing the position of the disks, i.e., have the tool on top. Short to medium length strokes are used. When I arrived at the finest grade of emery, I flash polished the disks with cerium oxide by rubbing with a piece of cloth until the disks became glossy enough to be tested by interference. Shoot for no more than seven interference fringes. More, and the difference in curvature will be too big to be removed during polishing.
Relative convexity is better than relative concavity. But please do not take every one of these hints as pronouncements from heaven. Many roads will lead to success.
The interference test apparatus is of the utmost simplicity.
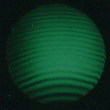
I use the light from an energy-saving lamp which illuminates an apparatus used to cut slide strips. The light that escapes from the bottom of this box is filtered through a piece of green plastic. This 'filter' was cut from a product that is normally used to protect paper documents. This crude filtering increased the contrast of the interference fringes considerably. The two stacked elements lie, barely visible, on a piece of red plastic on the floor. It is important to place the secondary on top. This ensures more even illumination of the surface under test.
The mirrors are then carefully cleaned - not a speck of dust is allowed on the surfaces!
Distorted interference patterns are a consequence of dirt.

I never did achieve straight lines which would indicate perfectly conforming surfaces.
At the verge of giving up, I realized that curved fringes were okay too - as long as they
are evenly curved. In that case, they simply indicate the continously
growing air gap between the surfaces. But beware of uneven patterns. The
fewer the fringes that appear, the more sensitive the test becomes. If at all
possible, I feel one should try to reduce the number of fringes, when testing the surfaces
slightly inclined to each other, to less than ten. But a critical, keen eye should be able
to make out slight irregularities even when quite many fringes are visible.

To aid in the interpretation of the pattern, I devised the simple FringeTester pictured
below. Please recall that the interference test produces straight lines if the slightly
tilted surfaces are both spherical and of equal radius of curvature. Now if the surfaces
are of slightly different radius of curvature, the appearance of the pattern changes as
indicated in the illustration at left. When the spherical surfaces get slightly tilted with respect
to each other, and are of relative convexity, the fringes become arcs of circles of
increasing radius as we move away from the point of contact. When we look for errors on the
secondary, all we have to do is to look for deviations from circularity.
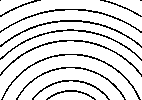
Enter the FringeTester. It simply consists of a sheet of plastic intended for overhead projections or a thin piece of glass. A series of circular arcs of sufficient width and separation is then drawn onto it with indelible felt pen. After placing the FringeTester atop the optical elements and aligning it with the fringes, it becomes easier to check the accuracy of the figuring. A disturbing parallax effect is unavoidable because of the thickness of the secondary.
A solution for the well-equipped telescope maker consists in taking a picture of the
interference pattern with a digital camera as close to the source of light as possible.
The device is then used in conjunction with the image on the computer screen. Aside from
getting rid of the parallax, there are no additional bothersome reflections from the
plastic sheet or glass. Contrast and image size are easily adjusted to optimum. However,
it is advisable to photograph the mirrors from as high above as possible, and with the
longest focal length, to minimize deformations from the photographic setup. An additional
source of distortions is the lens of the camera. To minimize distortions, use the
following procedure: Place the optics on a piece of paper inside a circle, half an inch
larger than the mirrors. On the screen, measure the diameter of this reference circle
among various angles. Use the controls of either the monitor or viewer software to
minimize the deviations from circularity. This way, the least damage is done to the image
due to the photographic setup. Nevertheless, I strongly recommend that the last tests are
done with the FringeTester above the mirrors, although the patterns may be somewhat
difficult to see. Practice helps. It certainly pays to eliminate possible sources of
error during final testing (Hubble!). If, for some reason, one ends up with too big a radius
difference to do the interference test, see the sidebar
on the Stevick-Paul design manual.
I always ended up with quite many fringes: one time of convexity, the other time with even more of concavity. Careful examination of the fringes always lead to a satisfactory, though not perfect, figure.
The star test has always shown very good looking patterns, the only detectable error was a slight spherical undercorrection.
I want to emphasize that one does not have to be an expert glass pusher to make a set of high-quality mirrors for an instrument like this. But careful and critical examination of the convex element is critical for success.
The flat quaternary is military surplus. It should be stated that a slightly curved 'flat' does not spell disaster in a TCT, as it would in a Newtonian. The 'flat' produces astigmatism, but that astigmatism will automatically be cancelled out during collimation. Result: There will be less astigmatism in a TCT than in many Newtonians despite many people's fear of astigmatism in TCT designs!
It was easy to keep the radii of the mirrors within 1.5% of the nominal value which is
more accurate than needed.
It is often recommended that enhanced coatings be used on three- and four-mirror designs. I had an expensive multi-layer coating applied to the three mirrors I made and regret it. The coatings produced a yellowish cast. My personal advice is to use enhanced coatings only when cost is truly a secondary consideration and one knows what one gets from the manufacturer.
When the optical elements were declared finished, I optimized the design using the actually measured radii of the mirrors in David Stevick's great Winspot software. By the way, the design by Michael Brunn I chose for my project is canned as Tetra64 in the file window of Winspot.
Not only could the optical quality be improved a little, I also got precise values for
the mechanical parameters for the construction of the optical tube assembly.
Now, over to the mechanical department!
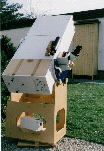
I opted for a box-like, closed structure. It offered easy, precise construction and
little internal turbulence. As an added bonus, there are no dewing problems. As a
disadvantage, one has to accept more mass. The lower section of the tube features
a large door for easy access to primary and tertiary, and ventilation for faster thermal
equilibrium.
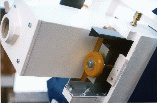
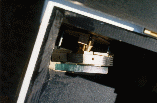
The mirror mounts are of a peculiar type. There are two pulling screws in the tangential plane and two pushing screws in the sagittal plane. These mounts work, but it is quite often necessary to tune the alignment a bit. It can be recommended to add an appropriate locking screw or a strong spring to every adjustment screw, at least to the heavy primary's mirror cell, to lock down alignment more permanently. A good example for such a mount is depicted on page 122 of the March 2001 issue of Sky & Telescope.
A second reason for the mirrors getting out of precise collimation might be humidity that warps the cheap and thin plywood side panels. Therefore, I encourage others to try out warp-resistant, lightweight materials such as medium density fiberboard, or the like, to cover the frame. The frame consists of 15mm (0.6") pine strips at the edges of the box.
It is necessary to make sure that the vertices of the mirrors and the center of the
eyepiece are all placed in the same plane to avoid additional coma and astigmatism that
would not cancel out during collimation.
The focuser is moved by turning a threaded rod of 6mm diameter. Focus is so snappy with
these instruments that the fine focusing with the threaded rod is, in my eyes, a must. The
construction is robust to accommodate a quite heavy binocular attachment with two
eyepieces.
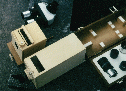
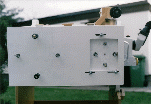
There are two focus adapters to reach the focus for either ordinary eyepieces, or
for a binocular viewing attachment which requires 140mm of inward focal range. The plate
upon which the focal adapters are mounted glides between four pieces of angled aluminum.
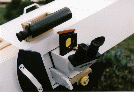
The focus adaptors are each equipped with a slot that accepts a holder for 49mm (2")
diameter photographic or home-mounted filters. Lacking screws, the filters can be changed
in an instant.
![]()
One large baffle made of thin plywood holds off most of the stray light. It should be noted that the form of the oval cutout in the illustration is only approximate. A second baffle, consisting of a short piece of heavy black paper and attached to the secondary holder, cuts off the rest of direct skylight. The focus adaptors contain three internal baffles. Baffling is absolutely complete, with nothing but blackness visible around the image of the primary.
It should be noted that the focal plane is tilted by 8.9°. I did not take measures to compensate for this. There is a very slight decrease in sharpness to the left and right when eyepieces of the largest field stop are used, but this is not bothersome. It is never seen by people who do not exactly know what to look for. It is possible to compensate for this by tilting the focuser by 8.9°. The direction of this tilt is seen in the layout in the display window of Winspot.
Collimation :
Collimation consists of centering all the optical elements, which is very easily done if
one starts with the quaternary and proceeds methodically to the primary. Then one uses
the star test to home in on the best alignment. This can be time consuming the first
time, especially when one has to remove considerable amounts of coma as well. But I
learned very quickly!
It is advisable to design a tube assembly that allows for one mirror separation to be
varied (preferably the primary-secondary distance), and one mirror to be movable laterally.
This is, in my case, as can be seen in the photos, the tertiary. But I did not need these
extra degrees of freedom. Varying the tilt angles alone allowed for total
collimation. But I strongly recommend that the plane quaternary be movable in all
directions in the plane of symmetry, especially when it is just big enough
to accommodate the light cone, as it unfortunately is in my instrument.

The scope moves on a Dobsonian stand. The altitude bearing consists of polyethylene pads on
one side and furniture rollers under the circular arc.
The movement in azimuth is accomplished using two small, standing ball bearings and one furniture roller to increase friction. Otherwise, movement would be too easy.
The eyepiece changes only 5cm (2") in height when the scope is swung from horizon to
zenith. Viewing without pain in the neck at last! Weight of the tube is 12kg, length
112cm (44").
The telescope is suited well to solar observing with a mylar solar filter. It was mounted separately on a plywood frame to permit easy change and secure attachment with four screws. The filter unit is mounted to a piece of plywood that blocks the light to the telescope. This board is securely screwed to the telescope tube. I have only one set of eyes! A hole of 4-½" diameter was cut centered into the board to reduce the light even a little more and match the entrance aperture to the daytime seeing conditions. With this filter, I first saw the solar granulation.
The whole project took, with many interruptions which had nothing to do with difficulties of construction, three years to complete. It was a challenge for me since I had to find solutions to unusual problems, to make the parts with rather limited tools and machinery: a jigsaw and drill on a drill-press stand. No lathe was required. No component was bought. I got everything I needed, aside from the ball bearings, in hardware stores whose U.S. equivalent would be Home Depot or Lowes.
"Can I make such a design with very simple means?", I asked myself when I searched for those Duran disks in my parent's garage.
It is possible, and if I could do it, well, most if not everyone can.
I enjoy observing with this instrument! The optical quality is flawless, limited only by mirror diameter and seeing. And I always feel that deep satisfaction that results from effort.
Note: Many practical aspects which arise with the construction of Brunn telescopes are similar to Stevick-Paul Telescopes. Therefore, I recommend visiting the Stevick-Paul design manual on this site.
Bibliography :
This project would not have become a success without the following books.
First of all, Jean Texereau's classic How To Make A Telescope, Willmann-Bell. Aside from countless workshop hints, it features an excellent section on making a convex mirror and testing it by interference.
More information on interference testing is in Optical Shop Testing, by Malacara, Wiley-Interscience. It's very technical, and the mathematically inclined will probably get the most out of it.
For German-language visitors, Kurt Wenske's Spiegeloptik is still valuable. It's a Sterne und Weltraum paperback.
Finally, Harold Richard Suiter's Star Testing Astronomical Telescopes, Willmann-Bell. This godsend was most important to evaluate the finished instrument and to tweak it to its limits.
The ATMJ is recommended for monitoring the latest in telescope making.
I want to thank David Stevick for his open-mindedness, motivating support in making this write-up a reality, and more generally, creating this focus site for TCT's of all designs and makings.
Tranquil skies!
Curator: Hartmut Frommert
[contact]
[Schiefspiegler Home]
[SEDS]